Proton Calorimetry/Experimental Runs/2017/Aug10-31: Difference between revisions
SimonJolly (talk | contribs) No edit summary |
|||
| Line 43: | Line 43: | ||
A picture of the bright scintillator has successfully been taken using the MAPS sensor. | A picture of the bright scintillator has successfully been taken using the MAPS sensor. | ||
[http://www.hep.ucl.ac.uk/pbt/wikiData/images/PRIAPUS/LED_Scint10mm_100kHz_5V_30ns_1frame_1sDAQ_1sensor_cRTS_17.tif.pdf Single picture with background 10mm] | [http://www.hep.ucl.ac.uk/pbt/wikiData/images/PRIAPUS/LED_Scint10mm_100kHz_5V_30ns_1frame_1sDAQ_1sensor_cRTS_17.tif.pdf Single picture with background 10mm] | ||
<div style="text-align: center;"> | |||
[http://www.hep.ucl.ac.uk/pbt/wikiData/images/PRIAPUS/LED_Scint10mm_100kHz_5V_30ns_1frame_1sDAQ_1sensor_cRTS_17.tif.pdf http://www.hep.ucl.ac.uk/pbt/wikiData/images/PRIAPUS/LED_Scint10mm_100kHz_5V_30ns_1frame_1sDAQ_1sensor_cRTS_17.tif.pdf] | |||
<br />Single picture with background]. | |||
</div> | |||
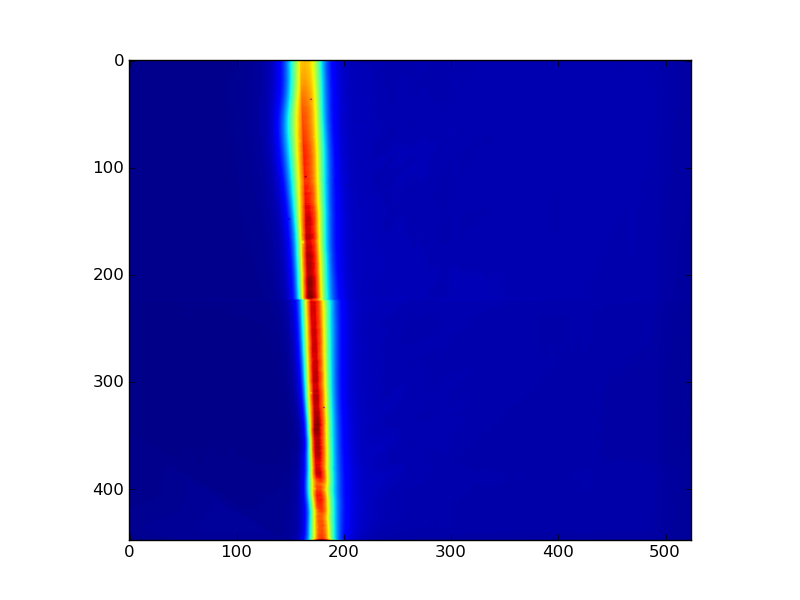
After summing all pictures and subtracting the background measurement, the following image quality may be obtained: | After summing all pictures and subtracting the background measurement, the following image quality may be obtained: | ||
Revision as of 16:52, 22 August 2017
Experimental tests with Nuvia 10mm and 3mm scintillator sheets and Pravda CMOS stacked sensor.
Set-up of the MAPS sensor
This section contains the instructions to take images with the MAPS sensor developed for the PRaVDA collaboration. In order to use the MAPS sensor, three components are essential:
- MAPS sensor integrated in board
- Multiplexer
- Computer with aSpect software
Follow these steps to take an image with the MAPS sensor:
- Launch computer. Password: aSpect
- Some window will open automatically. In "Drive U Substitution" select first entry. Then press "substitute".
- Open "IDMate":
- In "DUT Grap" (find it in upper left corner) select "Init Testsystem" and press "play" button.
- TCP will show error message.
- Set settings:
- n21: Stream_master: value=1
- n32: CB111_En: value=1
- n46: BeamClk_En: value=0
- Confirm by pressing "Set all"
- Select "DUT init CT mode" and press play button.
- To record frames, select "Streaming Start" and press play. It will ask you to select a file name. After confirmation, frames are recorded.
- More important settings:
- n24: Set saving path for file.
- n26: Stream_repeats: set number of frames. "0" equals one frame, "1" equals two frames, etc.
- n28:Stream_daqtime: integration time of sensor in seconds. Must be an integer between 1 and 6.
- To exit IDMate, select "DUT Exit" and press play button.
- Files are stored in a binary format. In order to have a quick look at the output, use "Pravda file viewer".
- Select file in upper bar. Then press "Read file".
- Select "Image" button to see visualisation of the binary data.
- There is the possibility to export the data as .txt file or .tif image.
Analysis of binary data
There is a python script allowing to quickly plot and analyze the binary data generated by a MAPS sensor, written by Michaela Esposito. All necessary functions are collected in CMOS_functions.py. A minimum example of how to use those functions can be found in example.py.
The MAPS sensor will take 45 images per second. It is important to note that the first three images recorded by the MAPS sensor (numbered "-1", "0", and "1"), have to be discarded because of image errors. In addition, the upper five pixel rows of of each image show irregular behaviour and should be discarded in further analysis.
10th August
On the 10th of August 2017, a first test of the MAPS sensor guided by Dr. Michaela Esposito took place at UCL. A scintillator sheet of 1cm thickness has been flashed by an LED. The distance between MAPS sensor and scintillator was about 1cm. The LED has been flashed at a bias voltage of 5V and a frequency of 100kHz, corresponding to the maximum save settings to operate the LED.
A picture of the bright scintillator has successfully been taken using the MAPS sensor. Single picture with background 10mm
http://www.hep.ucl.ac.uk/pbt/wikiData/images/PRIAPUS/LED_Scint10mm_100kHz_5V_30ns_1frame_1sDAQ_1sensor_cRTS_17.tif.pdf
Single picture with background].
After summing all pictures and subtracting the background measurement, the following image quality may be obtained: Summed background-subtracted picture 10mm
14th August
On the 14th of August 2017, more tests of the MAPS sensor, using a 3mm thick scintillator sheet have been performed at UCL. The MAPS sensor successfully recorded a picture of the scintillator sheet flashed with an LED. Summed background-subtracted picture 3mm