Software/Geant4/Tutorials/Advanced/High-Precision Dosimetry: Difference between revisions
SimonJolly (talk | contribs) (Created page with "== <span style="color:#000080"> Introduction </span> == This tutorial is based on the [http://geant4-dna.org/ Geant4-DNA project] tutorials. We chose to show three of the exampl...") |
(Formatting and minor corrections to code.) |
||
| Line 1: | Line 1: | ||
== | == Introduction == | ||
This tutorial is based on the [http://geant4-dna.org/ Geant4-DNA project] tutorials. We chose to show three of the examples: | This tutorial is based on the [http://geant4-dna.org/ Geant4-DNA project] tutorials. We chose to show three of the examples: | ||
| Line 9: | Line 9: | ||
* <span style="color:#ff0000"> microbeam </span>: This example simulates the cellular irradiation beam line installed on the [http://www.cenbg.in2p3.fr/-AIFIRA-Home-?lang=en AIFIRA] electrostatic accelerator facility located at [http://www.cenbg.in2p3.fr/ CENBG], Bordeaux-Gradignan, France. This accelerator is mainly used to investigate the effects of low dose irradiation on living cells. A realistic cell phantom is obtained from confocal microscopy and from ion beam anlysis techniques. Alpha particles of 3 MeV are incident on this phantom. The output among other things is the dose deposited in the cell cytoplasm and in the cell nucleus. | * <span style="color:#ff0000"> microbeam </span>: This example simulates the cellular irradiation beam line installed on the [http://www.cenbg.in2p3.fr/-AIFIRA-Home-?lang=en AIFIRA] electrostatic accelerator facility located at [http://www.cenbg.in2p3.fr/ CENBG], Bordeaux-Gradignan, France. This accelerator is mainly used to investigate the effects of low dose irradiation on living cells. A realistic cell phantom is obtained from confocal microscopy and from ion beam anlysis techniques. Alpha particles of 3 MeV are incident on this phantom. The output among other things is the dose deposited in the cell cytoplasm and in the cell nucleus. | ||
== | == How to run the tutorials == | ||
=== Connect to the HEP cluster === | |||
<pre | <pre> | ||
ssh -X username@plus1.hep.ucl.ac.uk | ssh -X username@plus1.hep.ucl.ac.uk | ||
| Line 20: | Line 20: | ||
</pre> | </pre> | ||
=== Setup your environment === | |||
<pre | <pre> | ||
[username@plus1 ~]$ source /unix/pbt/software/ | [username@plus1 ~]$ source /unix/pbt/software/scripts/pbt.sh | ||
</pre> | </pre> | ||
=== Copy the code to your working directory === | |||
<pre | <pre> | ||
[username@plus1 ~]$ cp -r /unix/pbt/tutorials/advanced/DNAProject . | [username@plus1 ~]$ cp -r /unix/pbt/tutorials/advanced/DNAProject . | ||
| Line 34: | Line 34: | ||
</pre> | </pre> | ||
== dnaphysics: == | |||
=== Inside <code>/home/username/DNAProject/</code> create a directory === | |||
<pre | <pre> | ||
[username@plus1 DNAProject]$ mkdir dnaphysics_build | [username@plus1 DNAProject]$ mkdir dnaphysics_build | ||
</pre> | </pre> | ||
=== Compile the code with <code>make</code> and <code>cmake</code> === | |||
<pre | <pre> | ||
[username@plus1 DNAProject]$ cd dnaphysics_build | [username@plus1 DNAProject]$ cd dnaphysics_build | ||
| Line 52: | Line 52: | ||
</pre> | </pre> | ||
=== Run macro <code>dna.mac</code> === | |||
<pre | <pre> | ||
[username@plus1 dnaphysics_build]$ ./dnaphysics dna.mac | [username@plus1 dnaphysics_build]$ ./dnaphysics dna.mac | ||
</pre> | </pre> | ||
== dnageometry: == | |||
=== Inside <code>/home/username/DNAProject/</code> create a directory === | |||
<pre | <pre> | ||
[username@plus1 DNAProject]$ mkdir dnageometry_build | [username@plus1 DNAProject]$ mkdir dnageometry_build | ||
</pre> | </pre> | ||
=== Compile the code with <code>make</code> and <code>cmake</code> === | |||
<pre | <pre> | ||
[username@plus1 DNAProject]$ cd dnageometry_build | [username@plus1 DNAProject]$ cd dnageometry_build | ||
| Line 76: | Line 76: | ||
</pre> | </pre> | ||
=== Run macro <code>dnageometry.mac</code> === | |||
<pre | <pre> | ||
[username@plus1 dnageometry_build]$ ./dnageometry | [username@plus1 dnageometry_build]$ ./dnageometry dnageometry.mac | ||
</pre> | </pre> | ||
== microbeam: == | |||
=== Inside <code>/home/username/DNAProject/</code> create a directory === | |||
<pre | <pre> | ||
[username@plus1 DNAProject]$ mkdir microbeam_build | [username@plus1 DNAProject]$ mkdir microbeam_build | ||
</pre> | </pre> | ||
=== Compile the code with <code>make</code> and <code>cmake</code> === | |||
<pre | <pre> | ||
[username@plus1 DNAProject]$ cd microbeam_build | [username@plus1 DNAProject]$ cd microbeam_build | ||
| Line 100: | Line 100: | ||
</pre> | </pre> | ||
=== Run macro microbeam.mac === | |||
<pre | <pre> | ||
[username@plus1 microbeam_build]$ ./microbeam microbeam.mac | [username@plus1 microbeam_build]$ ./microbeam microbeam.mac | ||
</pre> | </pre> | ||
== | == How to analyze the data == | ||
=== | === dnaphysics === | ||
This is a [http://geant4advancedexampleswg.wikispaces.com/DNAPhysics link] to the official dnaphysics tutorial explanation notes. We recommend to read it before proceeding with this tutorial. | This is a [http://geant4advancedexampleswg.wikispaces.com/DNAPhysics link] to the official dnaphysics tutorial explanation notes. We recommend to read it before proceeding with this tutorial. | ||
==== | ==== Root file ==== | ||
The macro dna.mac produces two root files | The macro <code>dna.mac</code> produces two root files <code>dna_t0.root</code> and <code>dna_t1.root</code> with ntuples containing the following information for every step: | ||
* type of particle | * type of particle | ||
| Line 125: | Line 125: | ||
You can open the first root file and see the different ntuples: | You can open the first root file and see the different ntuples: | ||
<pre | <pre> | ||
[username@plus1 dnaphysics_build]$ root -l dna_t0.root | [username@plus1 dnaphysics_build]$ root -l dna_t0.root | ||
| Line 135: | Line 135: | ||
</pre> | </pre> | ||
You can analyze the root files using | You can analyze the root files using <code>plot.C</code> macro. | ||
<pre | <pre> | ||
[username@plus1 dnaphysics_build]$ root -l | [username@plus1 dnaphysics_build]$ root -l | ||
| Line 143: | Line 143: | ||
</pre> | </pre> | ||
The macro produces two plots. The first plot shows the distribution of the different physics plrocesses. The second plot shows the trajectory of the incident particle. [http://www.hep.ucl.ac.uk/pbt/RadiotherapyWorkbook/skins/common/images/DNAProject/dnaphysics/flags.txt Here] you can find the codes for | The macro produces two plots. The first plot shows the distribution of the different physics plrocesses. The second plot shows the trajectory of the incident particle. [http://www.hep.ucl.ac.uk/pbt/RadiotherapyWorkbook/skins/common/images/DNAProject/dnaphysics/flags.txt Here] you can find the codes for <code>flagParticle</code> and <code>flagProcess</code>. The root macro produces the following plots: | ||
http://www.hep.ucl.ac.uk/pbt/RadiotherapyWorkbook/skins/common/images/DNAProject/dnaphysics/plot.png | http://www.hep.ucl.ac.uk/pbt/RadiotherapyWorkbook/skins/common/images/DNAProject/dnaphysics/plot.png | ||
==== | ==== Run with different settings ==== | ||
You can change the type and the energy of the incident particle by modifying the macro dna.mac. Open the macro with editor pico: | You can change the type and the energy of the incident particle by modifying the macro dna.mac. Open the macro with editor pico: | ||
<pre | <pre> | ||
[username@plus1 dnaphysics_build]$ pico dna.mac | [username@plus1 dnaphysics_build]$ pico dna.mac | ||
</pre> | </pre> | ||
| Line 157: | Line 157: | ||
This is the content of the macro: | This is the content of the macro: | ||
<pre | <pre> | ||
#/control/execute vis.mac | #/control/execute vis.mac | ||
/tracking/verbose 0 | /tracking/verbose 0 | ||
| Line 175: | Line 175: | ||
</pre> | </pre> | ||
==== | ==== Visualisation ==== | ||
There is an option to run dna.mac with visualisation (in dna.mac uncomment line /control/execute vis.mac). However, runing with visualisation is very slow and it is not recommended. | There is an option to run dna.mac with visualisation (in <code>dna.mac</code> uncomment line <code>/control/execute vis.mac</code>). However, runing with visualisation is very slow and it is not recommended. | ||
=== | === dnageometry === | ||
This is a [http://geant4advancedexampleswg.wikispaces.com/DNAGeometry link] to the official dnageometry tutorial explanation notes. | This is a [http://geant4advancedexampleswg.wikispaces.com/DNAGeometry link] to the official dnageometry tutorial explanation notes. | ||
==== | ==== Root file ==== | ||
The macro dnageometry.mac produces a root file | The macro <code>dnageometry.mac</code> produces a root file <code>dnageometry.root</code> with ntuples. The ntuples contain information for those geant4 steps for which the deposited energy in the DNA backbone is different from zero: | ||
* type of particle | * type of particle | ||
| Line 194: | Line 194: | ||
* step length [nm] | * step length [nm] | ||
You can analyze the root files using | You can analyze the root files using <code>plot.C</code> macro. First, copy this macro to your directory, then run the root | ||
macro. | macro. | ||
<pre | <pre> | ||
[username@plus1 dnaphysics_build]$ cp /home/username/DNAProject/dnageometry/plot.C . | [username@plus1 dnaphysics_build]$ cp /home/username/DNAProject/dnageometry/plot.C . | ||
| Line 209: | Line 209: | ||
http://www.hep.ucl.ac.uk/pbt/RadiotherapyWorkbook/skins/common/images/DNAProject/dnageometry/plot.png | http://www.hep.ucl.ac.uk/pbt/RadiotherapyWorkbook/skins/common/images/DNAProject/dnageometry/plot.png | ||
You can modify root macro | You can modify root macro <code>plot.C</code> and plot the other ntuples. | ||
=== | === microbeam === | ||
This is a [http://geant4advancedexampleswg.wikispaces.com/MicrobeamExample link] to the official microbeam tutorial explanation notes. | This is a [http://geant4advancedexampleswg.wikispaces.com/MicrobeamExample link] to the official microbeam tutorial explanation notes. | ||
==== | ==== Root file ==== | ||
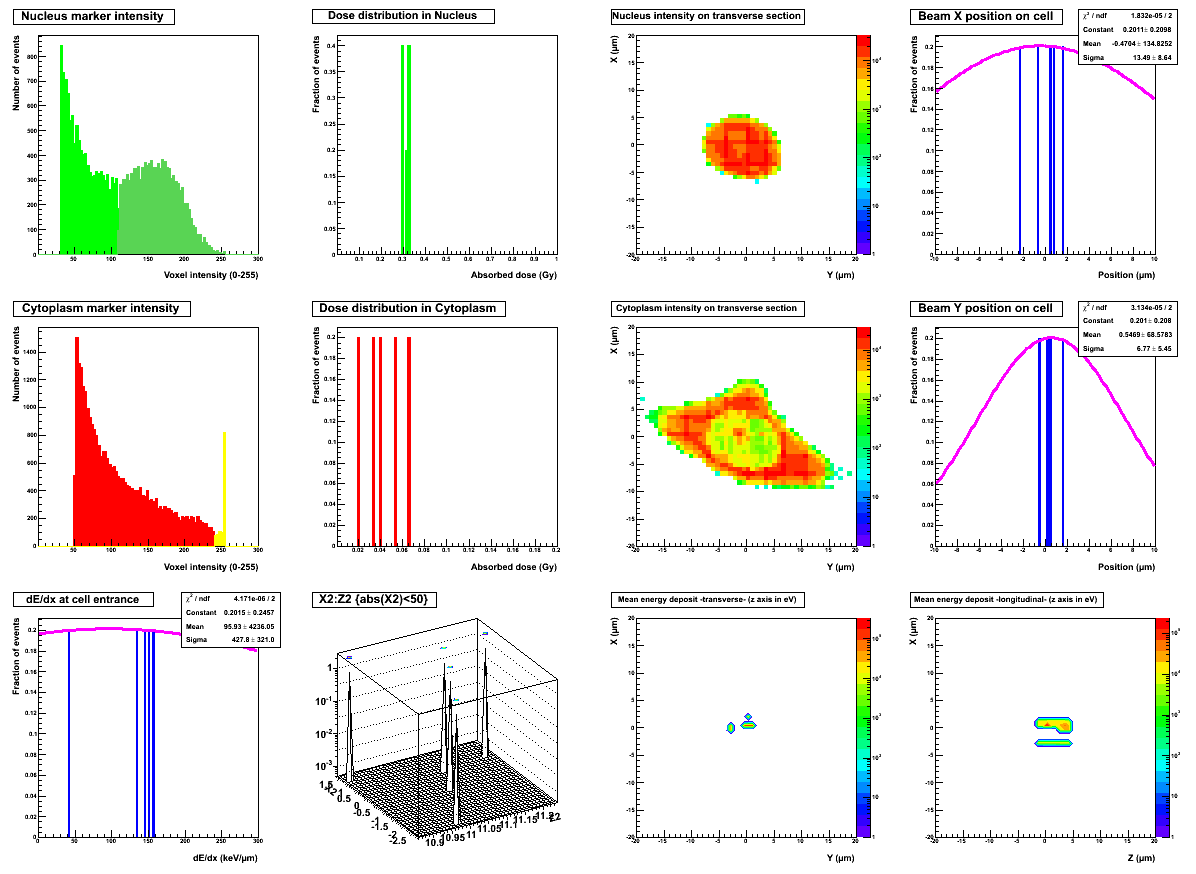
The macro microbeam.mac produces root files | The macro <code>microbeam.mac</code> produces root files <code>microbeam_t0.root</code> and <code>microbeam_t1.root</code> with ntuples grouped in five folders. | ||
You can analyze the root ntuples using the | You can analyze the root ntuples using the <code>plot.C</code> macro. | ||
<pre | <pre> | ||
[username@plus1 dnaphysics_build]$ root -l | [username@plus1 dnaphysics_build]$ root -l | ||
| Line 228: | Line 228: | ||
http://www.hep.ucl.ac.uk/pbt/RadiotherapyWorkbook/skins/common/images/DNAProject/microbeam/plot.png | http://www.hep.ucl.ac.uk/pbt/RadiotherapyWorkbook/skins/common/images/DNAProject/microbeam/plot.png | ||
Latest revision as of 12:04, 26 September 2017
Introduction
This tutorial is based on the Geant4-DNA project tutorials. We chose to show three of the examples:
- dnaphysics : This example simulates track structures in 100-micron side cube made of liquid water. The physics processes are defined using class G4EmDNAPhysics. Here you can find more information about the different physics process that are used to build class G4EmDNAPhysics . Here you can find how to build your own G4EmDNAPhysics class. Simulated is a an electron beam using class G4ParticleGun. The beam is shot from the center of the cube. The output of this tutorial is a root ntuple with type of particle, type of physics process, energy deposit, energy loss and step length for every simulation step.
- dnageometry : This example simulates track structures of different charged particles within a simplified geometrical model of the DNA molecule in a cell nucleus. Here you can read more about the DNA structure. Simulated are 6109 DNA pairs with the following structures: double helix, nucleosome, chromatine fibres, chromatine fibre loops and chromosome territories. Proton beam is simulated using class G4ParticleGun. The physics processes are defined using class G4EmDNAPhysics. The output is a root ntuple with type of particle, type of physics process, energy deposit and step length for every simulation step.
- microbeam : This example simulates the cellular irradiation beam line installed on the AIFIRA electrostatic accelerator facility located at CENBG, Bordeaux-Gradignan, France. This accelerator is mainly used to investigate the effects of low dose irradiation on living cells. A realistic cell phantom is obtained from confocal microscopy and from ion beam anlysis techniques. Alpha particles of 3 MeV are incident on this phantom. The output among other things is the dose deposited in the cell cytoplasm and in the cell nucleus.
How to run the tutorials
Connect to the HEP cluster
ssh -X username@plus1.hep.ucl.ac.uk

username@plus1.hep.ucl.ac.uk's password: type your password here
Setup your environment
[username@plus1 ~]$ source /unix/pbt/software/scripts/pbt.sh
Copy the code to your working directory
[username@plus1 ~]$ cp -r /unix/pbt/tutorials/advanced/DNAProject .

[username@plus1 ~]$ cd DNAProject
dnaphysics:
Inside /home/username/DNAProject/ create a directory
[username@plus1 DNAProject]$ mkdir dnaphysics_build
Compile the code with make and cmake
[username@plus1 DNAProject]$ cd dnaphysics_build

[username@plus1 dnaphysics_build]$ cmake -DGeant4_DIR=/unix/pbt/software/dev /home/username/DNAProject/dnaphysics

[username@plus1 dnaphysics_build]$ make
Run macro dna.mac
[username@plus1 dnaphysics_build]$ ./dnaphysics dna.mac
dnageometry:
Inside /home/username/DNAProject/ create a directory
[username@plus1 DNAProject]$ mkdir dnageometry_build
Compile the code with make and cmake
[username@plus1 DNAProject]$ cd dnageometry_build

[username@plus1 dnageometry_build]$ cmake -DGeant4_DIR=/unix/pbt/software/dev /home/username/DNAProject/dnageometry

[username@plus1 dnageometry_build]$ make
Run macro dnageometry.mac
[username@plus1 dnageometry_build]$ ./dnageometry dnageometry.mac
microbeam:
Inside /home/username/DNAProject/ create a directory
[username@plus1 DNAProject]$ mkdir microbeam_build
Compile the code with make and cmake
[username@plus1 DNAProject]$ cd microbeam_build

[username@plus1 microbeam_build]$ cmake -DGeant4_DIR=/unix/pbt/software/dev /home/username/DNAProject/microbeam

[username@plus1 microbeam_build]$ make
Run macro microbeam.mac
[username@plus1 microbeam_build]$ ./microbeam microbeam.mac
How to analyze the data
dnaphysics
This is a link to the official dnaphysics tutorial explanation notes. We recommend to read it before proceeding with this tutorial.
Root file
The macro dna.mac produces two root files dna_t0.root and dna_t1.root with ntuples containing the following information for every step:
- type of particle
- type of physics process
- x, y and z coordinates of the beginning of the step
- total energy deposit alo[eV]
- step length [nm]
- kinetic energy difference along the step [eV]
You can open the first root file and see the different ntuples:
[username@plus1 dnaphysics_build]$ root -l dna_t0.root

root [1] new TBrowser

Select ROOT Files, dna_t0.root and Folder dna

Click on the different leafs
You can analyze the root files using plot.C macro.
[username@plus1 dnaphysics_build]$ root -l

root [1] .x plot.C
The macro produces two plots. The first plot shows the distribution of the different physics plrocesses. The second plot shows the trajectory of the incident particle. Here you can find the codes for flagParticle and flagProcess. The root macro produces the following plots:

Run with different settings
You can change the type and the energy of the incident particle by modifying the macro dna.mac. Open the macro with editor pico:
[username@plus1 dnaphysics_build]$ pico dna.mac
This is the content of the macro:
#/control/execute vis.mac
/tracking/verbose 0
/run/verbose 2
#/dna/det/setMat G4_WATER_MODIFIED
/dna/det/setMat G4_WATER
/gun/particle e-
#/gun/particle proton
#/gun/particle hydrogen
#/gun/particle alpha
#/gun/particle alpha+
#/gun/particle helium
/gun/energy 1 keV
/run/initialize
/process/em/auger true
/run/beamOn 100
Visualisation
There is an option to run dna.mac with visualisation (in dna.mac uncomment line /control/execute vis.mac). However, runing with visualisation is very slow and it is not recommended.
dnageometry
This is a link to the official dnageometry tutorial explanation notes.
Root file
The macro dnageometry.mac produces a root file dnageometry.root with ntuples. The ntuples contain information for those geant4 steps for which the deposited energy in the DNA backbone is different from zero:
- type of particle
- type of physics process
- the two DNA strands
- x, y and z coordinates of the post step [nm]
- total energy deposit alo[eV]
- step length [nm]
You can analyze the root files using plot.C macro. First, copy this macro to your directory, then run the root
macro.
[username@plus1 dnaphysics_build]$ cp /home/username/DNAProject/dnageometry/plot.C .

[username@plus1 dnaphysics_build]$ root -l

root [1] .x plot.C
The macro produces a plot that shows the position of the two DNA strands in two colors. The spheres represent the amino bases. The plot shows only the DNA pairs with deposited energy (see the ntuple deffinition in SteppingAction.cc).

You can modify root macro plot.C and plot the other ntuples.
microbeam
This is a link to the official microbeam tutorial explanation notes.
Root file
The macro microbeam.mac produces root files microbeam_t0.root and microbeam_t1.root with ntuples grouped in five folders.
You can analyze the root ntuples using the plot.C macro.
[username@plus1 dnaphysics_build]$ root -l

root [1] .x plot.C