Basic and Sequential Flasher
The Basic Flasher and Sequential Flasher are just used to control the pulser box. The simple program just controls one LED at a time, whereas the sequential one flashes a sequence of LEDs using the same settings. The pulser box can take a number of settings including height and width (of signal used to pulse LEDs) , number of pulses, interval between pulses, LED number to pulse, etc... For testing the pulser boxes and fibre bundles, all settings unless otherwise indicated, can be left at their default setttings.
When testing that a pulser box has
arrived intact, the sequential flasher can be used to pulse all LEDs in
sequence at a high light level and high repetition rate so that all the
fibres and LEDs can be seen to be working. Just use the start arrow and
stop buttons on the front panels of the vi. No settings should need to
be altered for this test.
OMC Testing Package
This package uses the simple flasher to control the pulser box, but also controls the picoscope to read out the light levels detected by the PIN diode array when testing fibre bundles or measuring the light output from a pulser box.
This vi has many more controls and settings. Again most of these can be left at their default value.
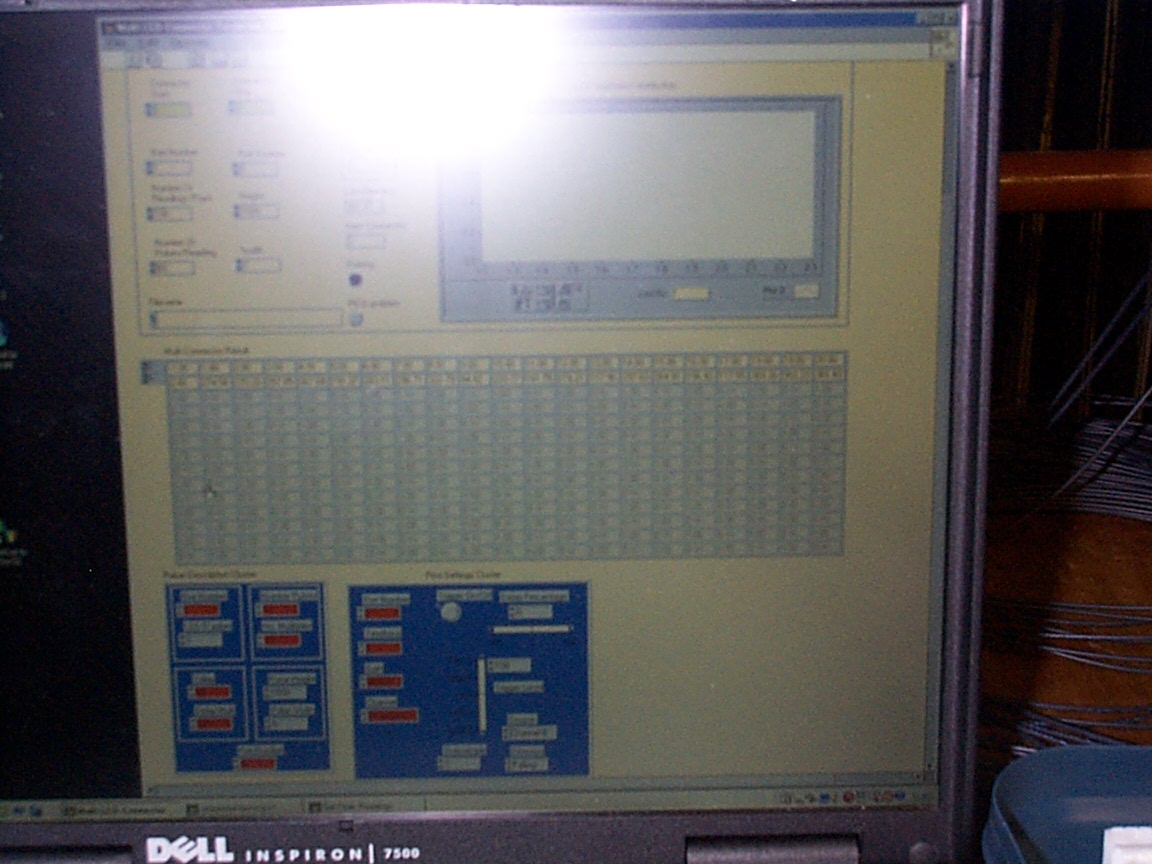
The main window shows a selection of controls in the upper left corner and a plot area in the upper right. The rest of the window is a spreadsheet.
A rather pathetic attempt to get a screenshot of the OMC test package LabView window. Nevertheless, the plot area in the upper right hand corner, the controls on the upper left, the spreadsheet and the two control clusters at the bottom can all be seen.
The controls allow different values
for the pulser box and for the analysis to be set. The height and width
for the LED settings (should be h=1000, w=7), the number of points/pulse
and number of measurements/point for acquiring the mean value for the peak
signal measured by the PIN diodes. These values should not need to change
except when measuring the pulser box light output from the PIN connectors.
The PIN connectors generally have a higher light output than the others
and so the PIN diodes will saturate if the pulser box is pulsed at h=1000
for these measurements, so use h=400 instead.
One other control is the connector
range to test. When testing a whole pulser box, set the first value to
1 and the last to 64 (or 65 to test the spare too). The program will then
pulse all LEDs in sequence then wait for you to swap the connectors on
the back of the pulser box before pulsing again. When testing individual
fibre bundles, set the first and last connector values to the same so that
it only pulses one sequence.
The plot area in the upper right hand corner shows a plot for each LED. When measuring the light output from all the connectors on the back of a pulser box, the program sorts the readings by LED, and fills a histogram for each LED. By the end of testing there will be 64 entries in each of 20 histograms. These can be scrolled through and manipulated using the buttons in that region of the window. These plots are not useful when testing individual fibre bundles as they tend to be done one or two at a time.
The spreadsheet region of the window is where the data is filled. This is the data that will be written to file when you are prompted to give a filename (do not use the filename setting in the settings region. It doesn't work.). The first row is the LED number and the first column is the connector. The program fills the spreadsheet as it goes and writes it to file row by row, (i.e. at the end of each row, it appends the new data to the currently open file).
At the bottom of the page, there are two "clusters". The Pico Settings Cluster and the Pulser Settings Cluster.
The Pico settings cluster has controls specific to the Picoscope used to sample the PIN diode signals. These include which channels to look at for signals and triggers as well as trigger levels, gains and timebase settings. Here the only setting that may need to be changed is the gain. The default value is 500mV which is usually ok for testing the connectors on the back of the pulser boxes and most fibre bundles. However in some cases some LEDs may be slightly brighter or some fibres may be more transmissive and so the gain value will need to be increased to 1V. Check for readings that are ~499 - these are probably maxing out. Only do this if you have to though as otherwise resolution is lost on the dimmer channels. (This will especially need to be changed when testing the light output from the PIN connectors on the pulser boxes.)
The pulser settings cluster contains more controls for the pulser box. These set the repetition rate of the pulsing and can be used to set the height and width. (However, the settings for the height and width in the main window overwrite any values set in the pulser cluster). Again, none of the pulser cluster settings need to be changed from the default values when testing.
Where to Save the Data Files
On the Desktop there is a folder called TSTCABLE. In this folder there are two more folders one for the pulser box test data "BOXES" and one for the fibre bundle test data "PLNCABLE"
Within BOXES there are separate folders for each pulser box named using the OMC labels. Add folders as necessary. Within a BOX folder, there will only be a few files, (typically: one file containing 65 rows for the normal connectors and another with 2 rows for the PIN connectors). (nb for the first few boxes there is one file per connector; this needn't be repeated for later boxes.)
Within PLNCABLE there is one file
per fibre bundle tested. The naming scheme is PxxxSIDE.TXT where
xxx is the plane number and SIDE is either EAST or WEST. PIN fibre
bundle test data is named PINxL.TXT where x is the pulser box number, L
is either H or L for high or low gain PIN connector (pulser box label).
Back to main LI installation page